UltiMaker Cura 5.5 beta Introduces Significant Print Speed Improvements and Powerful New Plugins
October 13, 2023
UltiMaker just released UltiMaker Cura 5.5 (currently in beta), and the primary focus has been speed improvements for UltiMaker S-Line 3D printers. But rather than focusing strictly on speed, UltiMaker's marketing materials talk about "productivity improvements". The reason for this is that their team wanted to provide increases to speed without sacrificing part quality or increasing failure rates.
The end result is that, using this latest version of Cura, you can reduce print times by around 35% on average using the same nozzle size and material. But thanks for new optimized profiles for the 0.8mm Print Cores, you can cut printing time by more than half through the combination of that larger nozzle and the slicing optimizations introduced in Cura 5.5.
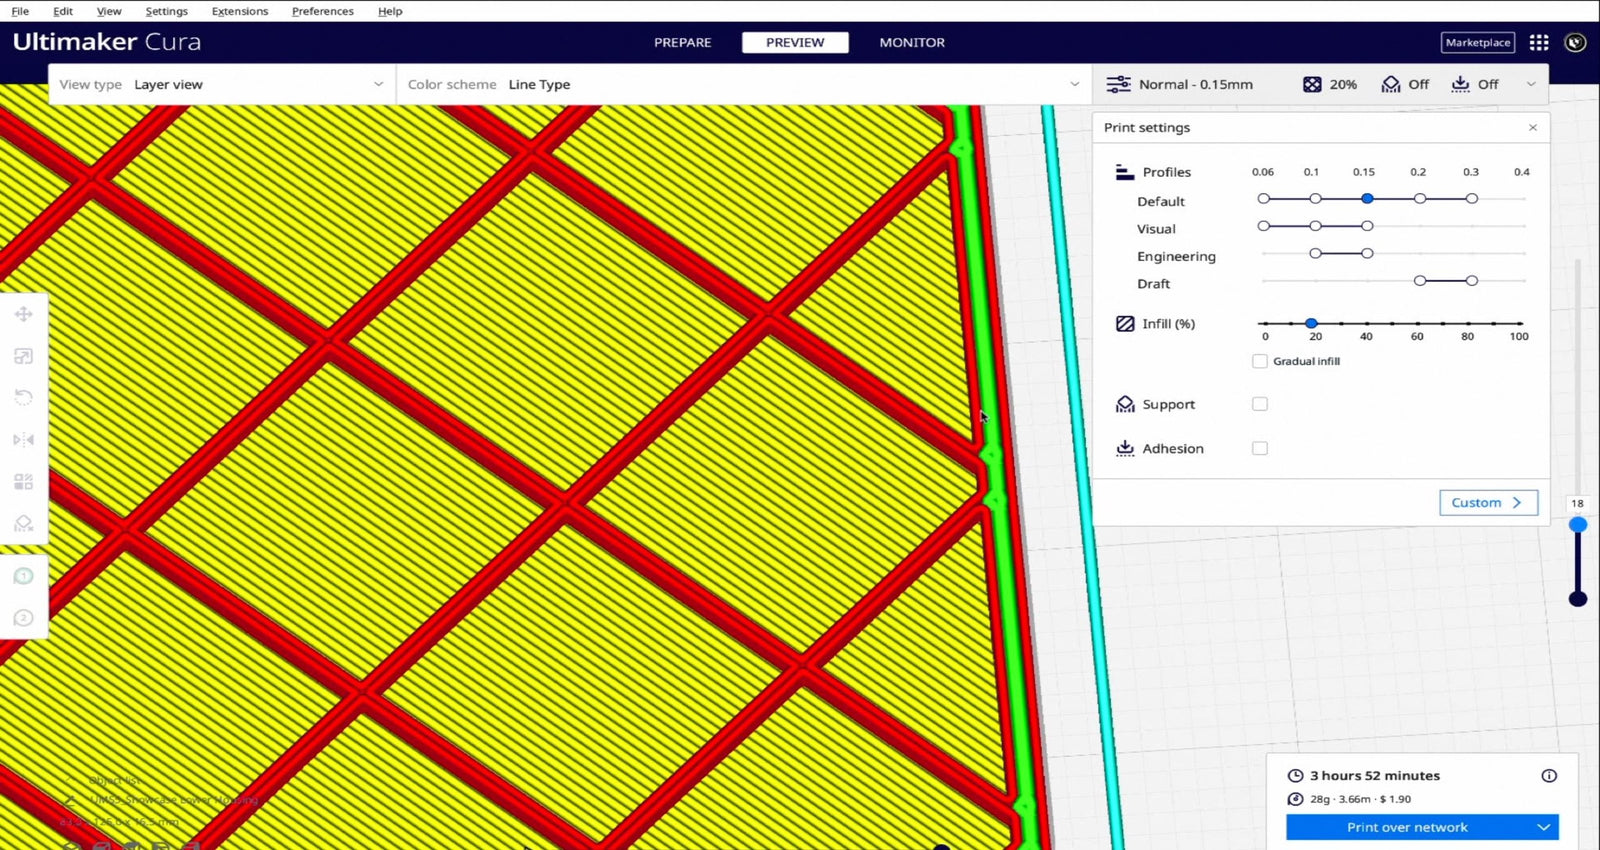
As an example of the speed improvements without changing print cores, this part when sliced in Cura 5.4 and printed in PETG on an S5 using an AA 0.4 mm print core would have taken 2 days and 35 minutes to print: 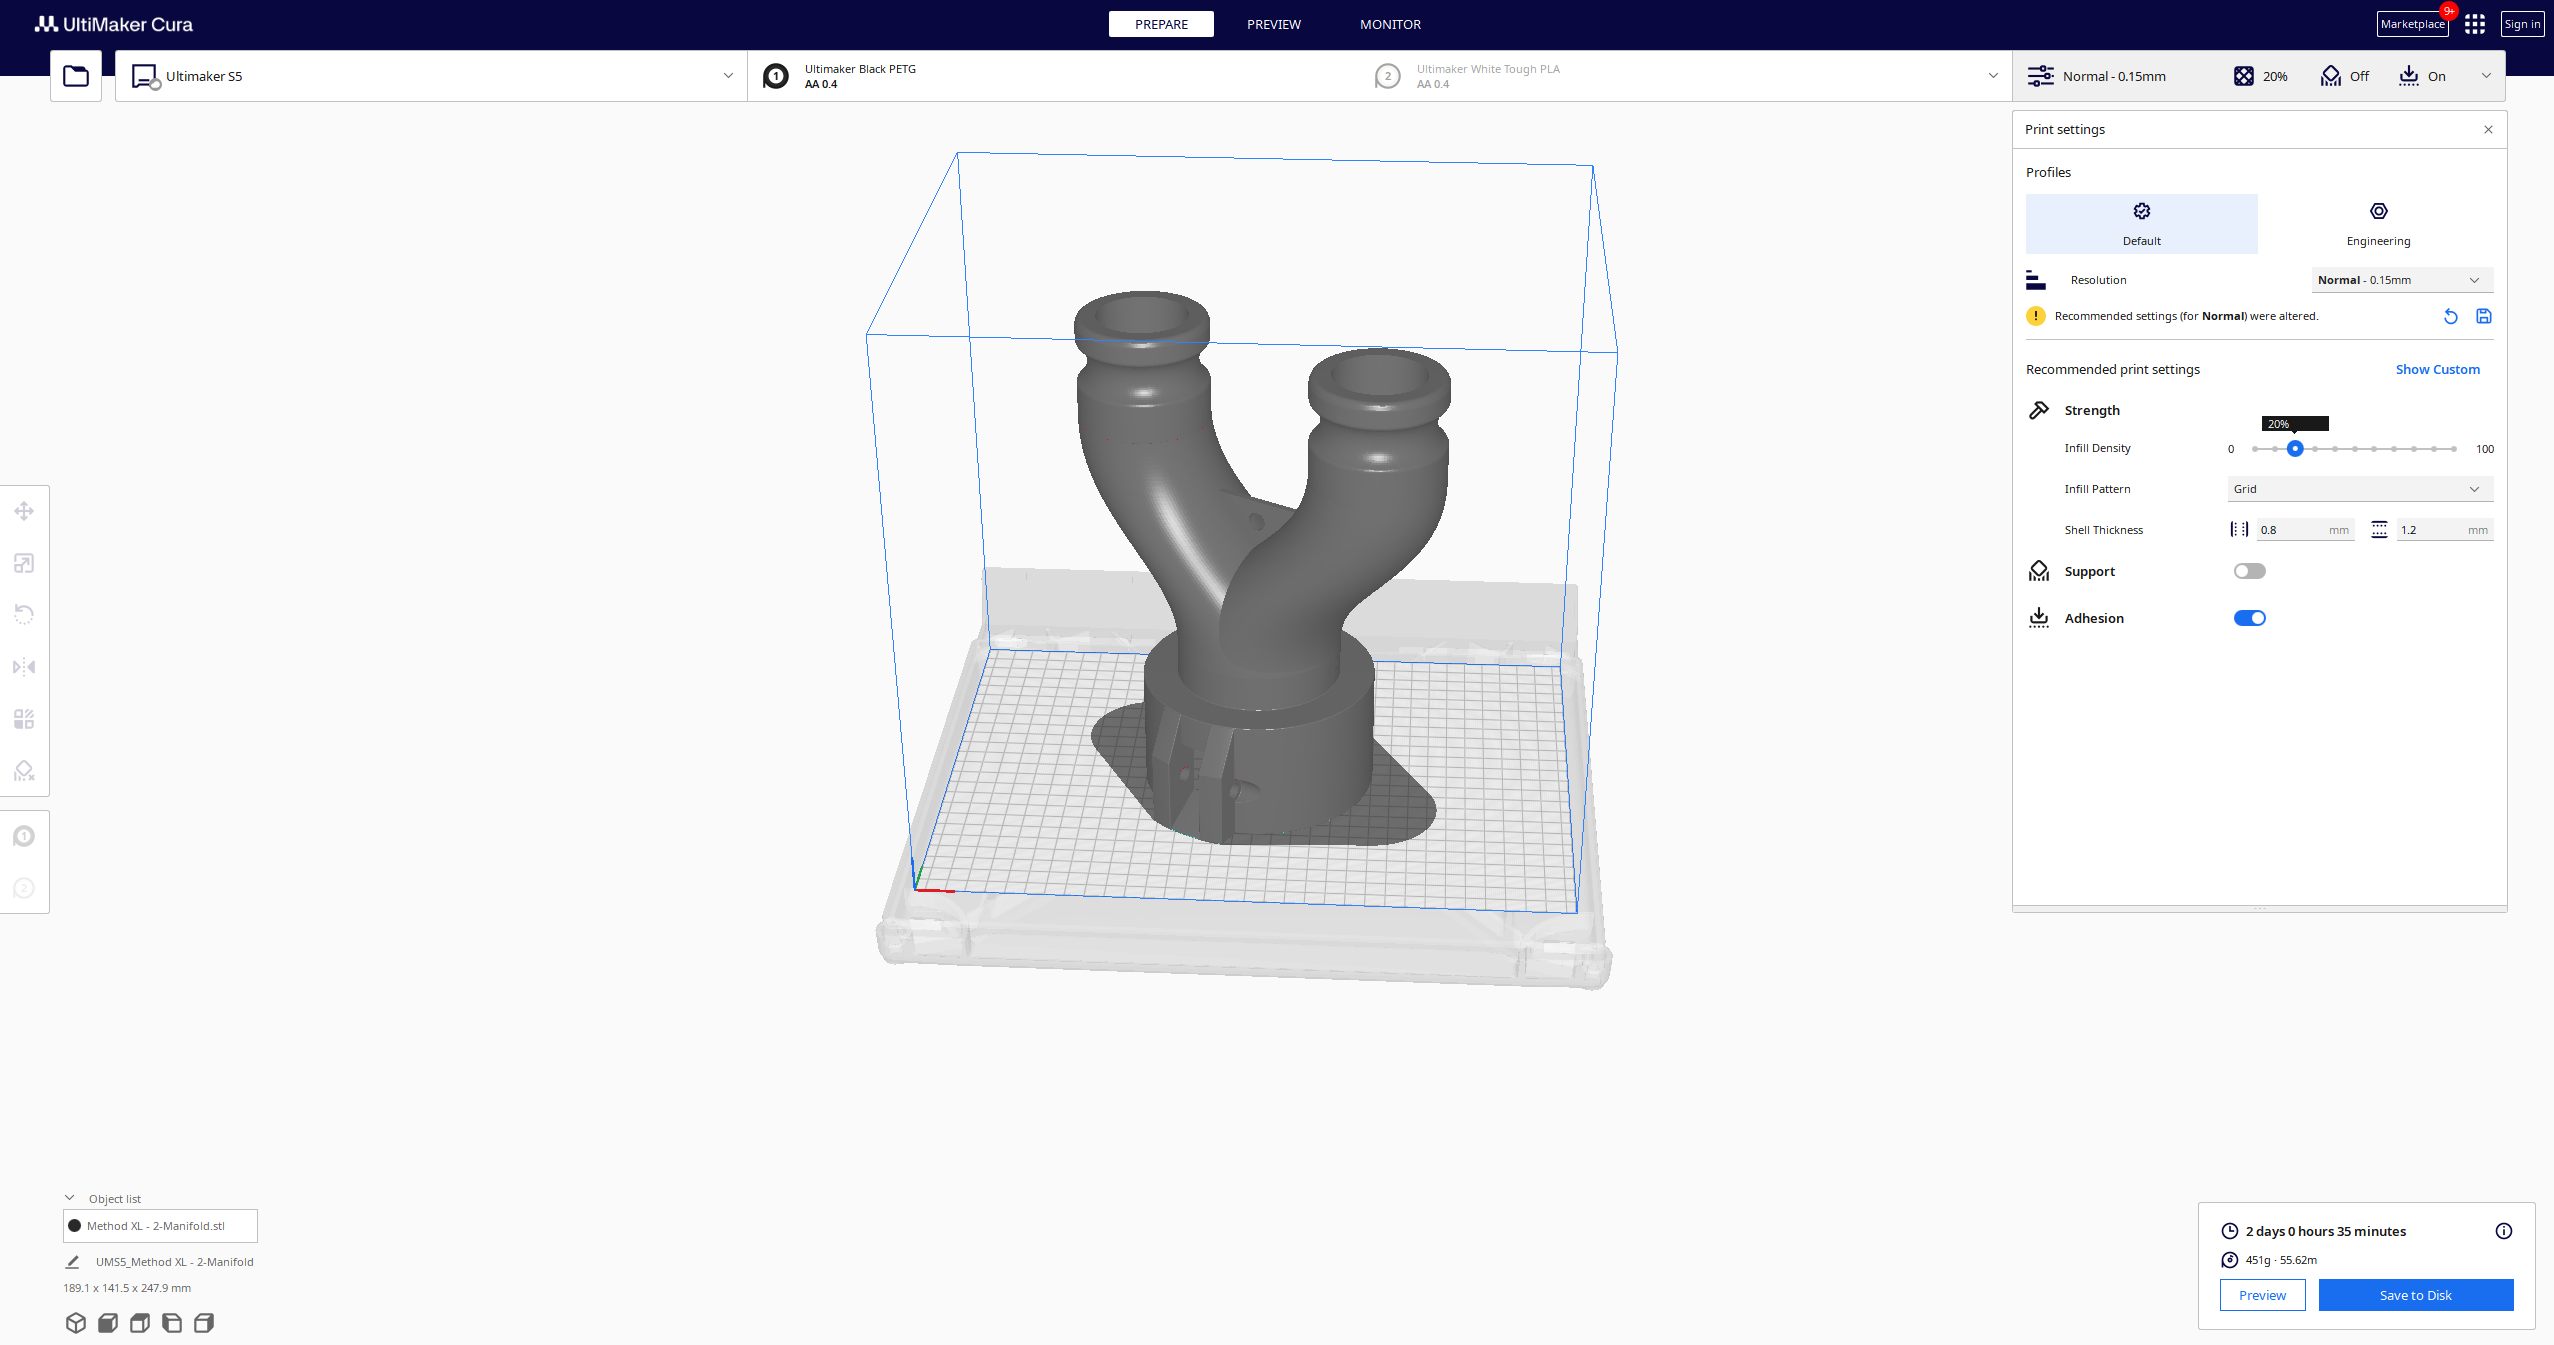
Using Cura 5.5 that same part will take just 1 day 7 hours and 19 minutes using the same material, extruder, and printer:

How Does Cura 5.5 Improve Print Speeds?
So how did UltiMaker achieve these print speed improvements without changing their 3D printer hardware? Essentially, they made further optimizations to the slicing engine, including the following key elements:
Optimized print speeds for different line types
Outer walls, inner walls, and supports are all printed at different speeds. UltiMaker optimized the print speed for these and other line types, while also adjusting the acceleration and deceleration behavior when moving between line types. As a result, the UltiMaker printers are now able to print internal structures faster without reducing the visual quality or mechanical properties of your part.
Smooth internal wall pathing
Previously, the inside of walls was printed using a diagonal pattern that resulted in the print head performing a jittery zig-zag motion during printing. This has been changed so that the inside of walls now print using long smooth lines, which enables the print head to reach higher speeds.
Prevent infill crossing close to walls
Tweaks have been made so that infill no longer overlaps near to external walls. Overlapping infill near walls can cause artifacts on the surface of your print, this change prevents those artifacts and also reduces print head travel, increasing print speeds.
For the full list, check out the release notes on GitHub. Speed gains will vary significantly depending on which material, nozzle size, or model you are using. The biggest improvements can be seen when printing large models and when printing multiple models at the same time.
AA 0.8 mm print cores get intent profiles as well as speed and quality improvements
UltiMaker's 0.8mm print cores have been around for several years, but many UltiMaker 3D printer owners haven't been made the switch from the standard 0.4mm print cores included with their machine. By introducing improved profiles for the AA 0.8mm print cores to Cura 5.5, UltiMaker is hoping that more users will take advantage the productivity boost offered by printing with a larger nozzle.
The AA 0.8 mm print profiles for UltiMaker PLA and Tough PLA have been optimized for both speed and print quality, as well as gaining access to recommended intent profiles.

One of the easiest ways to print more parts in less time on an UltiMaker printer has always been to use a larger nozzle size. 0.4 mm nozzles have become somewhat of an industry standard and as a result, the 0.4 mm print cores have long been the most popular. option However, UltiMaker also offers 0.8 mm print cores, and for many users, these would be a better choice.
As mentioned, moving to a larger nozzle size means much faster print speeds, with the tradeoff that your parts will have more prominent layer lines and, therefore, may not look as nice. However, all the way back at the release of Cura 5.0, a new slicing engine was released that enabled variable line width. This resulted in improved print quality when printing thin walls and fine details. What many people may not have realized, is that it’s also now possible to print using a 0.8 mm print core while still getting great print quality. If you're looking for the absolute best print quality then a 0.4 mm print core is still your best choice but if speed is a priority then a 0.8 mm print core is the better tool.
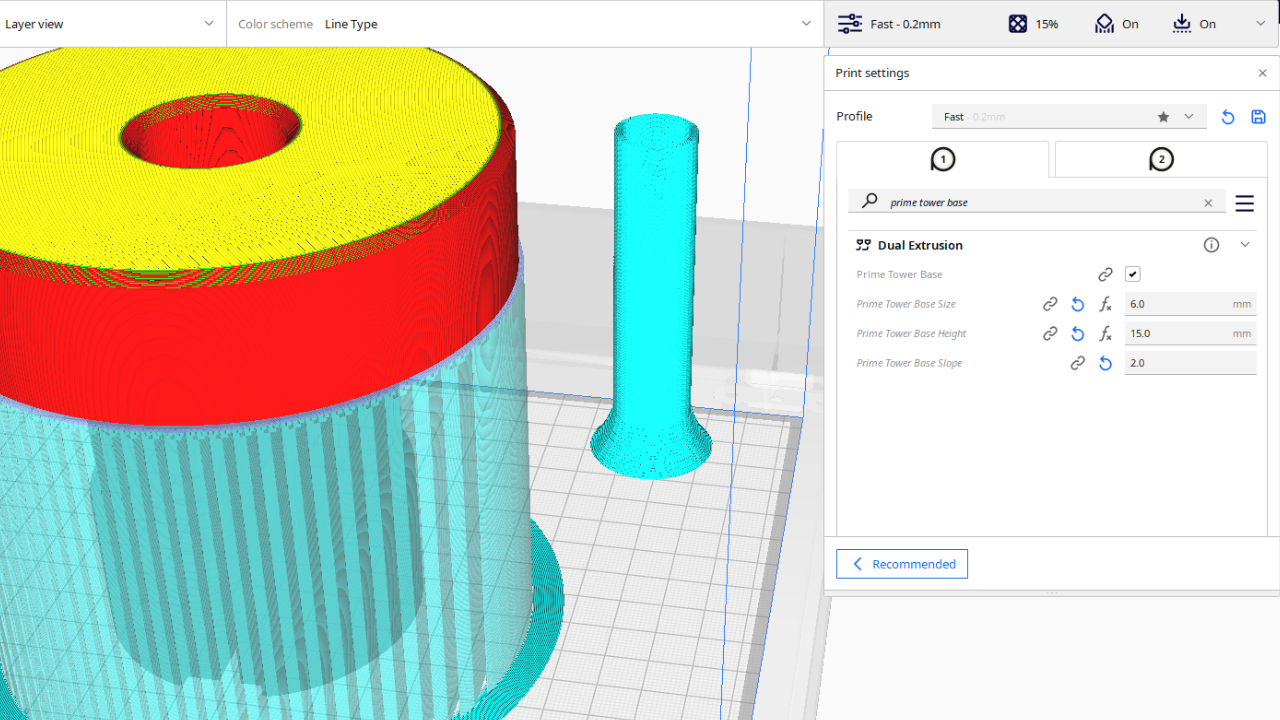
Our new 0.8 mm print profiles will make this easier than ever, allowing you to select the profile that matches your requirements (Visual, Engineering, or Draft) and then print with the confidence that you are using reliable print profiles that have been professionally tuned for your needs. Better yet, with the combined effect of moving from a 0.4 mm to a 0.8 mm print core and the other speed improvements in this release, you will find that it’s possible to print huge parts in less than half the time!
If you haven't yet tried a 0.8mm print core, it's worth exploring. Many users will end up using this as the default for printing most parts due to the productivity gains offered.
Powerful new engine plugins
Improved print speeds was not the only enhancement introduced with Cura 5.5. This release also sees a huge new addition which will fuel improvements for years to come: engine plugins with powerful new capabilities!
Since 2015, Cura has allowed members of the community to create plugins that add new functionality to Cura or augment existing functionality. Over the years, the UltiMaker team has improved the plugin system to make it easier to create and share plugins. Today you can find and download dozens of plugins through the UltiMaker Marketplace and many people have, with some of our most popular plugins being downloaded millions of times!
Examples of popular plugins include the Settings Guide plugin which adds additional context to the over 600 settings in Cura, and the OctoPrint Connection plugin which lets you use the popular OctoPrint web interface for remote printing and monitoring.
Up until now, the functionality of plugins has been limited to manipulating your parts before slicing and UI tweaks. Everything that happens after you start slicing your part could not be modified. In other words, if Cura was a car, plugins would allow users to modify the paint scheme, change the rims on the tires, and maybe even swap out the seats for something fancier. But everything under the hood was off-limits. You could make the car look better, even feel better, but it would still drive the same.
With the new plugin capabilities in this release, that has all changed. It is now possible to fundamentally modify how Cura works by interfacing with the slicing engine at the heart of Cura. This allows plugins to add new settings, modify existing settings, and change how Cura behaves when slicing a model. The result is more powerful plugins with a much wider range of capabilities. Some examples of the kind of functionality that users could add with these new plugins include:
- Paint on supports: By combining the new and existing plugin capabilities, it would be possible to create a plugin that allows you to manually tag areas as requiring supports.
- Version number in print: It’s possible to create a plugin that modifies the skin area on layer 0 to have a version number or any other custom text that will appear on the bottom of the model when printed
- Texture: You can use a plugin to give your model a custom texture embossed on the surface.
These are just some of the countless possibilities that are unlocked with engine plugins. As has always been the case, plugins still need to be approved before they are added to the Marketplace, so it is unlikely that a plugin will be dangerous, but it is important to be mindful that the expected behavior of Cura may change drastically when installing engine plugins.
Duplicate and organize models on your build plate more easily
Two new improvements have been added that make it easier than ever to fill up your build plate with models and organize them effectively.
The first is that you can now duplicate your models using the same copy-and-paste shortcuts you would when duplicating text. Just select the model you want to copy and press Ctrl+C, then Ctrl+V (Command+C and Command+V on Mac) as many times as you want to spawn additional copies of your model. Each additional instance of your model will be placed on your build plate as if it were a new model being loaded into Cura with the added benefit that any changes made to your original part, such as it being resized, will also be reflected in all duplicate models. Right-clicking your part will also bring up the copy/paste shortcuts in the context menu.
The second change is that you can now organize multiple models on the build plate using a grid formation. When multiplying your part or when using the new copy/paste function, parts will now be placed in a grid pattern. There is also a new option in the context menu (or when pressing Ctrl+Shift+R) that will arrange all instances of your model into a grid pattern.
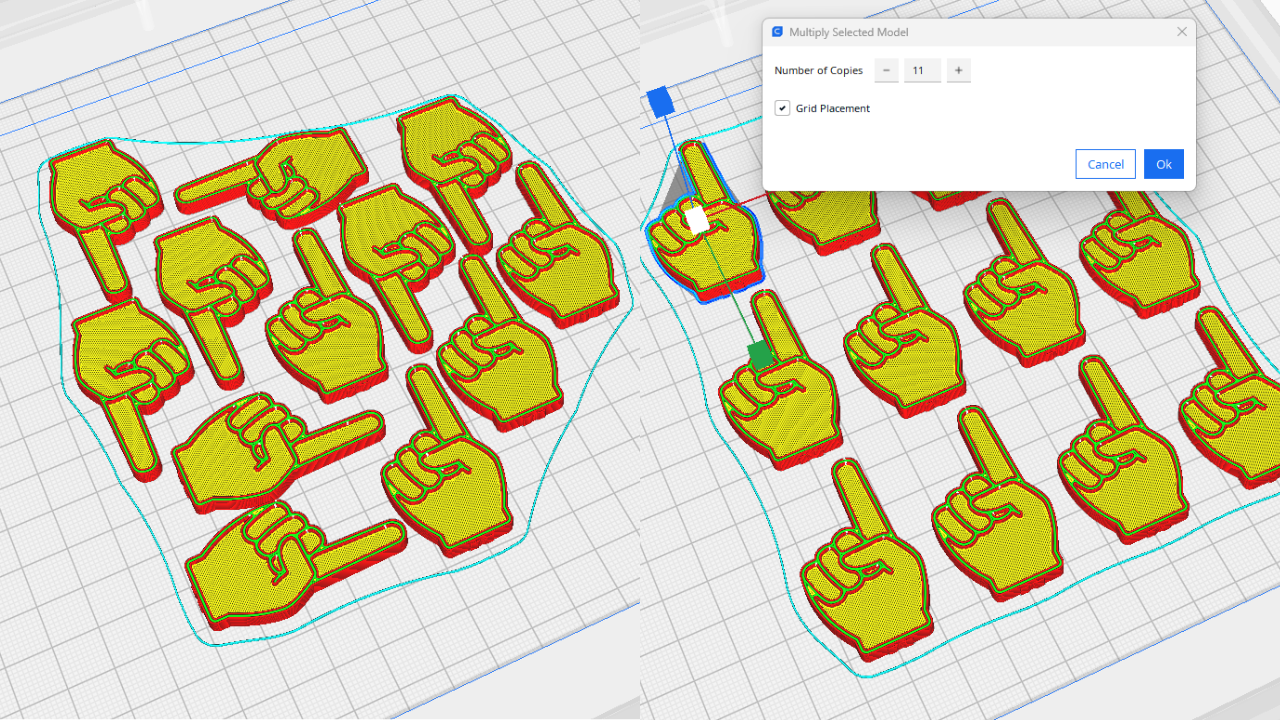
These two features combined make it much easier to fill your build plate with prints and keep them organized when doing so!
To learn more and see additional examples of the productivity improvements offered by Cura 5.5, visit our UltiMaker Speed Update with Cura 5.5 page.
To download the latest Cura 5.5 beta and try it for yourself, visit the UltiMaker Cura GitHub page.
Written By Jeremy Simon

There is so much happening in 3D printing right now! There is an enormous global community driving development, aided by each others’ efforts thanks to the Internet....
Related Articles
UltiMaker Cura v5.6.0 Adds Support for Method Series Printers and Prime Tower Improvements
Nov 16, 2023
The world's most popular slicing software keeps getting better! With the latest version of UltiMaker... More

Introducing Polar3D Cloud, the #1 Cloud-Based 3D Printing Platform in the World
Nov 30, 2022
We are excited to introduce you to Polar3D, a software company offering the Polar Cloud,... More
Ultimaker Cura 5.0 is Here!
Apr 27, 2022
It's here! Ultimaker Cura 5.0 is finally here! This exciting release introduces an entirely new... More
CURA Deep Dive Tour | Video with Jeremy Simon
Jun 10, 2020
During our “3D Printing in the Workplace and STEM Education” free virtual conference in April,... More

Ultimaker Cura Adaptive Layers Tutorial
Apr 06, 2018
How to use Ultimaker Cura Adaptive Layers to Reduce Print Time Without Sacrificing Quality In... More
Ultimaker Cura Software Announcement
Sep 26, 2017
Today, Ultimaker announced some major upcoming improvements to their Cura software, which will be called... More
Search All Articles
Latest Posts From Slicing Software
All Blog Categories
-
3D Universe Untethered Video Podcast Series
-
Digital Fabrication in Education
-
Digital Fabrication Projects
-
Digital Fabrication Tutorials, Tips, and Tricks
-
Slicing Software
-
3D Printing Materials
-
Case Studies
-
Digital Fabrication Products
-
3D Forming (Vacuum Forming & Pressure Forming)
-
Laser Cutters
-
Digital Fabrication in the Workplace
-
3D Printed Prosthetics and Assistive Technology
-
3D Modeling (CAD)
-
Digital Fabrication in the News


