Using a Potato to Make Gemstone Soap | Mayku FormBox
June 08, 2023

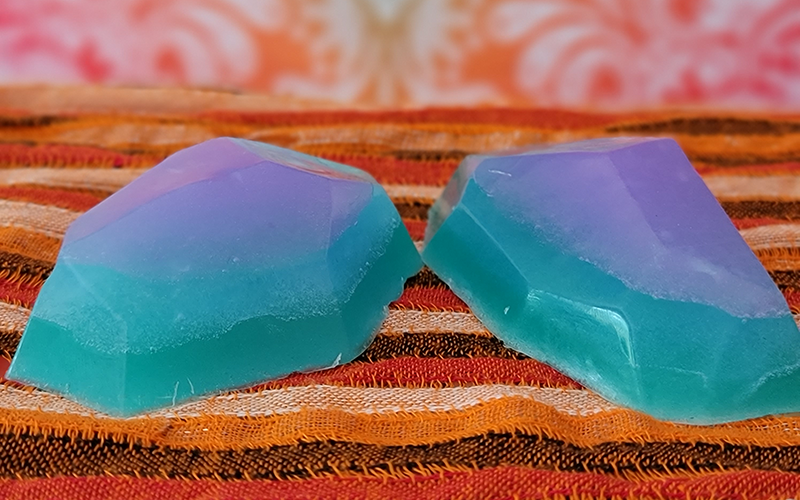
I love potatoes. They are one of my favorite foods on the entire planet. I love making them into volcanos with hot steamy “molten lava” gravy at Thanksgiving, cutting them into slabs and cubes to bake, fry, or shove into a breakfast burrito, or grating them down and turning them into tasty latkas. However, I never expected to end up using a potato to make gemstone soap on my Mayku FormBox vacuum former!
This was such a fun project to do and, honestly, one of the coolest things I have made so far with my Mayku! This would be a really nice project for kids to do in their classrooms or at home with their families to introduce them to the world of vacuum forming!
In the video below, I will take you through the process of how I created my gemstone soaps using a potato for a mold! Check it out on our Youtube channel and make sure you subscribe and follow along as I continue my experiments with different items and materials!
Turning a Potato into a Gemstone Soap Mold | Instructions

Step 1: Get Your Potatoes Peeled
The first thing you need is a couple of potatoes!
For this project, I wanted to make mine into larger soap molds so I used 2 Russett potatoes for my forms which allowed me to make numerous angled cuts and still end up with a handsoap-sized potato to use to make my mold.

Step 2: Give Your Potato a Wide, Flat Base and Angled Cuts
For this project, you will want to make sure that you create a flat base for your potato so that when you pour your soap into the mold, you have a nice even surface for your finished product.
I sliced a sliver off of one side of my potato to create a starting point so it would lay flat on my cutting board.

Once I had a flat side to work with as my base, I used my knife to slice small angled cuts into the top and sides to create a shape that resembled a gemstone, but also a tapered shape that would allow me to pop the final soap out of the mold easily.

For best results when using a vacuum former, you want a shape that tapers from smaller to wider, with the wider end being the side you lay flat onto the bed of the machine. This ensures that you will be able to get your finished product out of your mold without having to cut it away and thus giving you the option to reuse the same mold repeatedly instead of having to create a new one each time.

Step 3: Create Your Gemstone Mold on the Vacuum Former
After you have cut your potato down into the gemstone shapes you want, it is time to head to the Mayku FormBox vacuum former and turn it into a mold!
For this project, I used the Mayku 0.5 mm Cast Sheets and followed the directions for temperature settings.

It is important to wait until the mold is cooled off before you take it off of the vacuum former to avoid warping.

After the mold is cooled and you have taken your potatoes out, make sure you wash and dry the mold to remove the starch from the potato before you begin making your soap to pour into the mold.
Feel free to turn those potatoes into tasty snacks too so they don't go to waste! The cast sheets are food-safe!

Step 4: Prep your Space, Melt Your Soap Base and Add Colors and Fragrances
I had never made glycerin soaps before so I opted to go the easier route and purchase a base that you can melt down quickly in the microwave or double boiler. Make sure you get colors specifically made for soap making so you don't end up dying your skin with food coloring or other coloring options! (Unless you WANT to look like a smurf or have a need to “Hulk Smash” things!)
There are countless options for different scents for your soaps to choose from or you can also choose to go scent-free for those that are sensitive to smells and fragrances!


Follow the directions for your specific soap base and color brands for your soap.
*I highly recommend only melting enough soap base for one layer at a time, as it hardens a lot faster than you may anticipate! I learned very fast that it was a mistake to melt all of my soap bases at once instead of one at a time for each color and had to keep remelting it in the microwave as it hardened up again while I poured the first color!
Step 5: Pour Your Soap into Your Gemstone Molds and Wait!

Make sure that before you pour your soap into your molds, you have set them up in a deep enough dish to level them so that they lay flat while you add your layers. Without a casserole dish, bowl, or container of some kind to keep them level, your soap will spill out and will not layer properly.
Once you have layered your soap in the colors you want, leave them to harden for the recommended amount of time, based on the instructions.

Step 6: Remove You Soap From the Molds
Once your soap has hardened and set properly, simply pop them out from the mold and enjoy or wrap them up and give them as gifts to friends and family. Or better yet…open yourself an online store and start making some extra income with your own custom soap-making business!

What Are You Making?

I had so much fun with this project! I would love to hear from others who are using the Mayku FormBox to create interesting crafts, using them to start your own small business, or using this technology in your classrooms!
If you make a gemstone soap of your own, please tag us on Instagram (@shop3duniverse), Twitter (@3dprintingisfun) or Facebook (@3duniverse.org) so we can see your gemstone soap creations too!
If you are interested in sharing your vacuum forming projects with us on our upcoming season 3 of our web and podcast series “3D Universe Untethered” – please email us at info@3duniverse.org to share your story!


