"Serial Kilter" Cosplayer Creates 3D Printed Heavy Infantry Mandalorian Armor
September 20, 2023

What happens when cosplayer Dan Simon gets an Ultimaker 3 3D printer to help make PPE during a pandemic and then discovers that he can also use it to make his dream "Kilted 3D printed heavy infantry Mandalorian" armor? An epic adventure of trial and error, learning how to design, modify, and 3D print parts for his completed piece...oh and "a perfect COVID outfit - multi-layer mask (keffiyeh), face shield, >6' reach with the blaster cannon...".
Wouldn't it just make your day to find this guy at the grocery store with a shopping cart full of Star Wars Fruit snacks to stock up for the rest of the Pandemic? Of course it would. Is that even a question we need to ask?
We bribed Dan into sharing his story with us, his process and what he learned along the way during his build of this 3D printed Mandalorian armor and design adventures. Below is his story and images of his work as he taught himself how to use the 3D printer to make the armor for this cosplay character!
Cosplay, Costuming and Creativity | By "Serial Kilter" and Cosplayer Dan Simon
I've dabbled in this for years, but never too seriously. Doing a Dr. Horrible tribute, a gender-swapped Chell from Portal (learned to get around on jumping stilts for that one), and one or two others. Generally, costumes that required relatively little custom work – just piecing together different store-bought items and repurposing them.
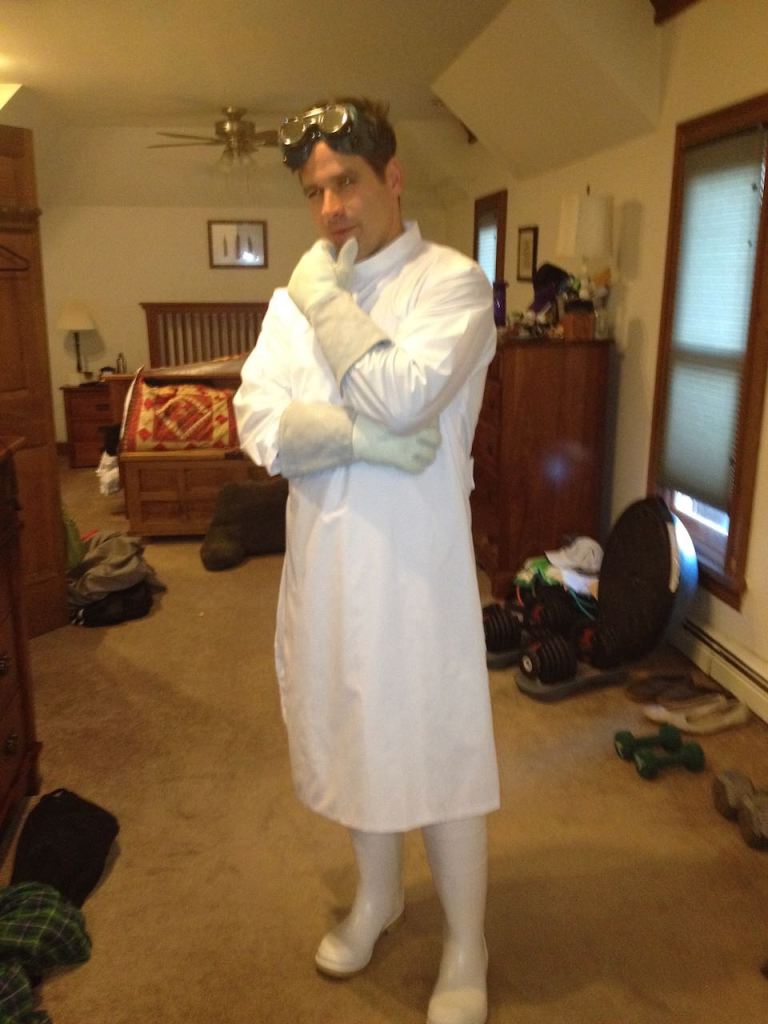
Then I had the decided lack of judgement to get into 3D printing. Originally this was to help make some PPE during the early days of the pandemic.
It felt good to help out.
Then I realized what many others had long-since discovered: 3D printing is a game-changer for the world of cosplay. All those costumes that required custom-shaped –hard parts? – Batman's armor, Master Chief, etc. – they were all now achievable with a little time, a LOT of filament, and some knowhow on both printing and finishing work. What can I say? I'm slow on the uptake.
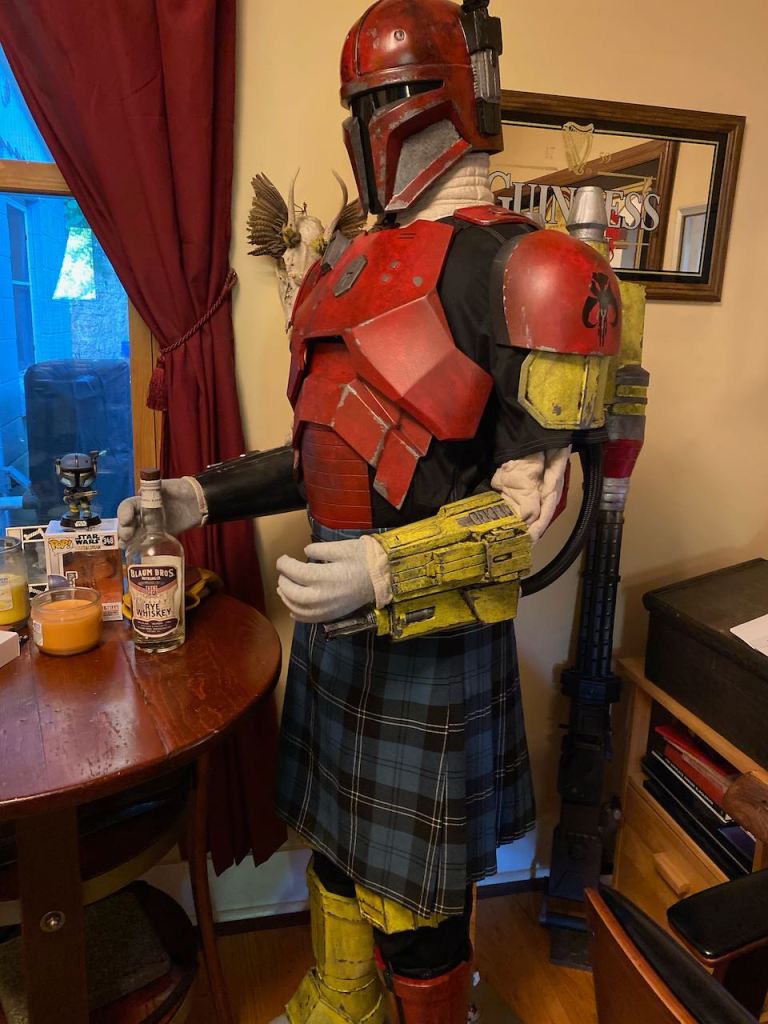
So, being the novice that I was (and still am) to the world of 3D printing, I decided that I'd take my slightly-less-than-new Ultimaker 3 and get to work on a modest project: the Heavy Infantry Mandalorian (aka Paz Vizla). You know–that guy that was armored head to toe and came in with the heavy blaster cannon during Episode 3 of Disney+'s "The Mandalorian." Nothing like diving straight into the deep end of the pool.

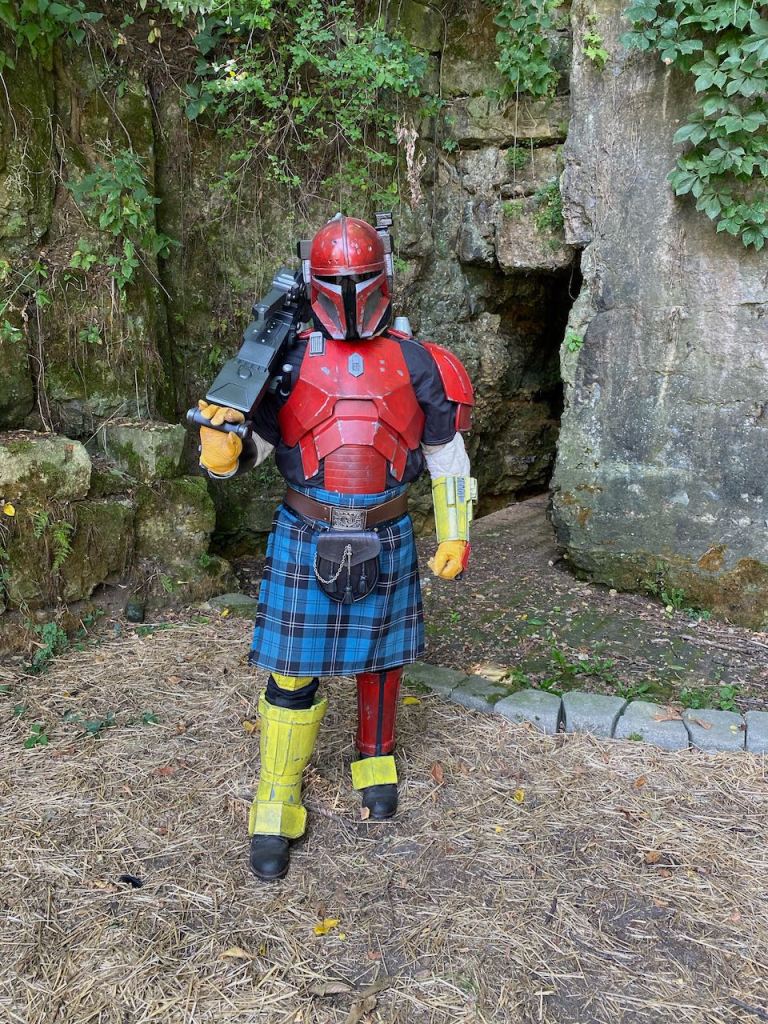
"What I was shooting for was not a clone of the suit from the show – it's my own interpretation on it. Different color-scheme for one. And kilted – a serial kilter's gotta kilt, and the opportunity to merge that into the costume was just too good to pass up."

The end result is something that I'm quite proud of – and pleased with, but it took a LOT of patience and quite a few "learning moments." I still consider myself a novice in the realm of 3D printing, so when Jeremy asked me to write a blog entry about my build I was hesitant – I have no place teaching you how to run a 3D printer – but I have made a TON of mistakes and learned from them, and that's something that I can talk about. Shorten the learning curve for those that want to get into this whole wacky 3D printed cosplay world. Maybe.
So, we'll go through my lessons-learned in roughly chronological order for the process (though not necessarily the order in which I learned the lessons). Starting with?
The Concept
OK–this isn't really a lesson learned, it's an area where I got lucky. I chose a concept that was meant to have seen some sh–.tuff. The armor was not meant to be pristine in any way – it needed to have dirt, dings, dents, and scars. Turns out it's a LOT easier to make things look battered than it is to make them look clean and shiny.
Clean and shiny shows every little imperfection. Old and battered hides them. So choose a concept that lends itself to your skill level - the weathered, battle-damaged suit of armor vs. the shiny and bright suit of flawless beskar. Or go bright and shiny and swing for the fences – just be prepared to have to re-do steps in the finishing work due to any number of annoyances (like a mosquito deciding to land on your freshly painted helmet).
The Design
If you're skilled enough to design and model your own STLs please skip past this section. This is for those of us who are going to source our designs from others. I searched the limited offerings I could find at the time until I found one whose look I liked. What I did not take into account was how it would all come together.
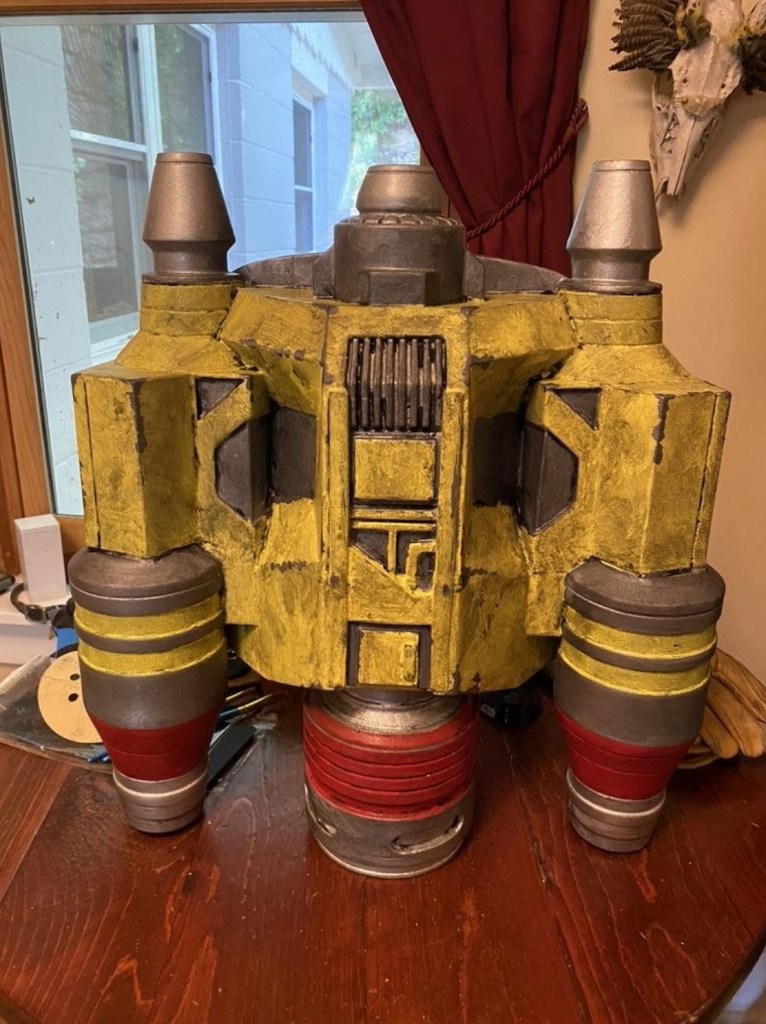
Sure I liked the look of the armor. And the jetpack was killer. But how was the jetpack meant to attach to the back plate of the armor? In looking for your STLs, make sure you think through all of this so you know what to look for in the designs that you finally choose. I ended up having to make a number of modifications to my finished pieces in order to get them all to join into one cohesive whole.
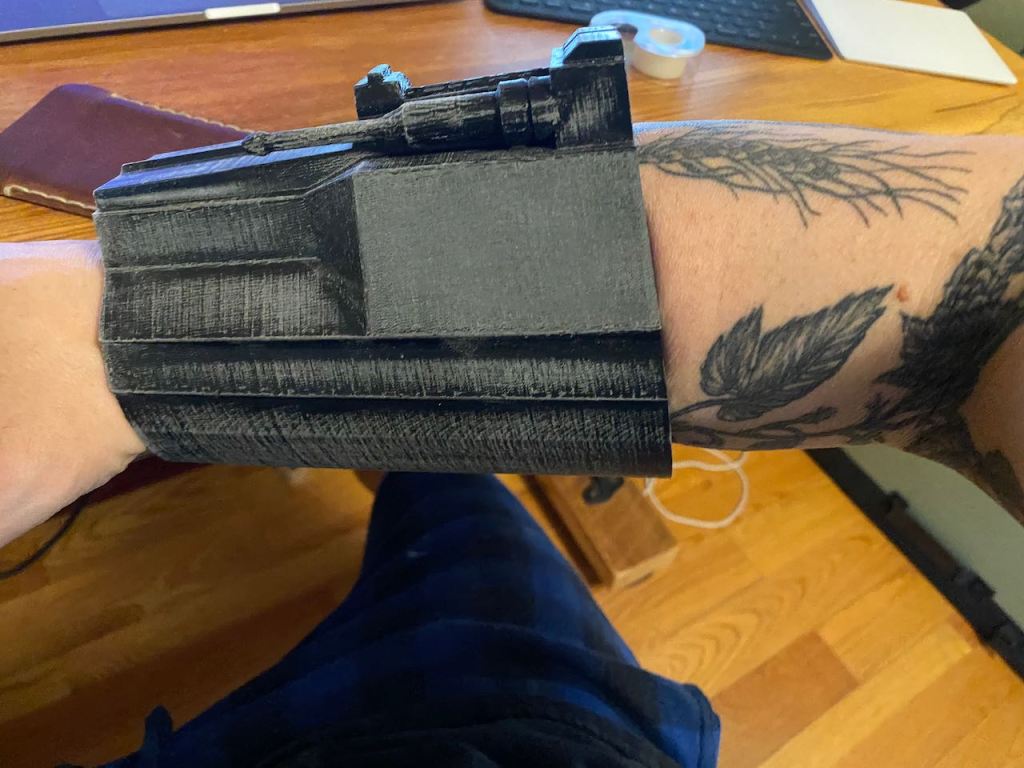
In particular, the jetpack needed to have strapping glued onto it after I was done painting. Pro-tip: you can glue down nylon strapping really firmly with a hefty dose of superglue–but it's only as strong as the bond between the paint and the piece.
Try to plan out what you're going to need to do to the piece before you start finishing work – that way you can take care of any gluing of attachments without having to undo your precious painting.
Sizing Your Pieces
If you-re planning on wearing what you print things get a bit tricky. There are a number of ways you can check this ahead of time – from apps like ArmorSmith to the more manual method that I chose of picking certain reference points on any given 3D printed Mandalorian armor piece (e.g. the distance between the two shoulder straps that connect the back plate to the upper chest plate) and measuring those on myself (where they should fall) and then measuring the same on the STLs in Meshmixer to determine the actual distance on what I was planning to print, scaling the STL to match what I needed.
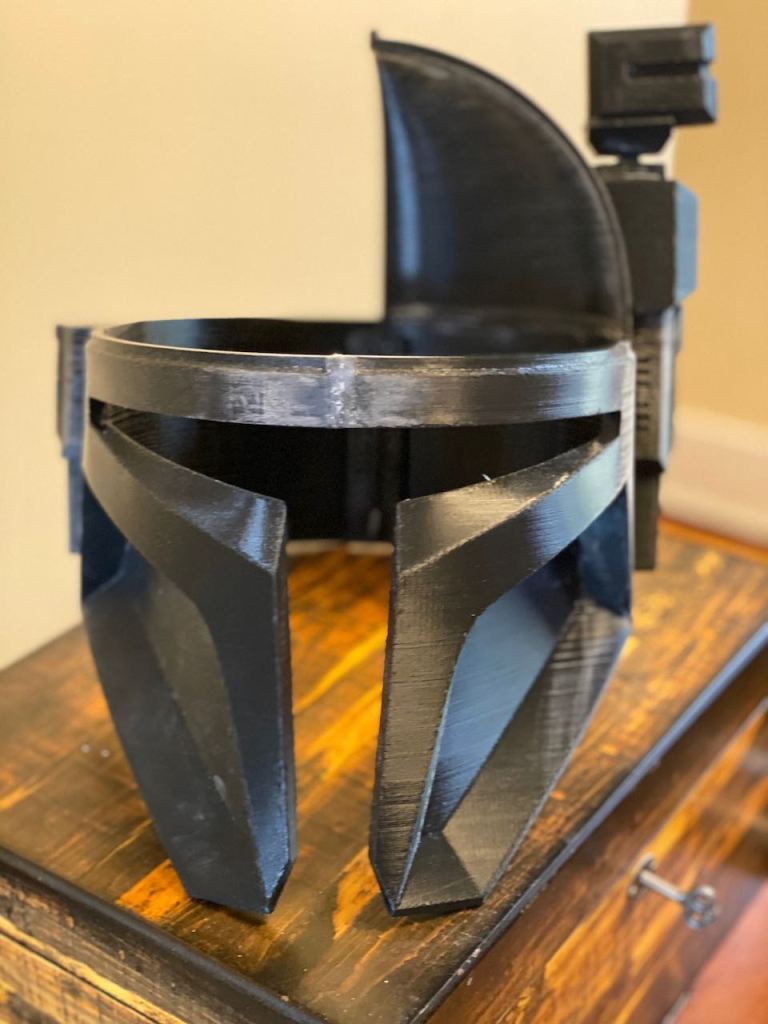
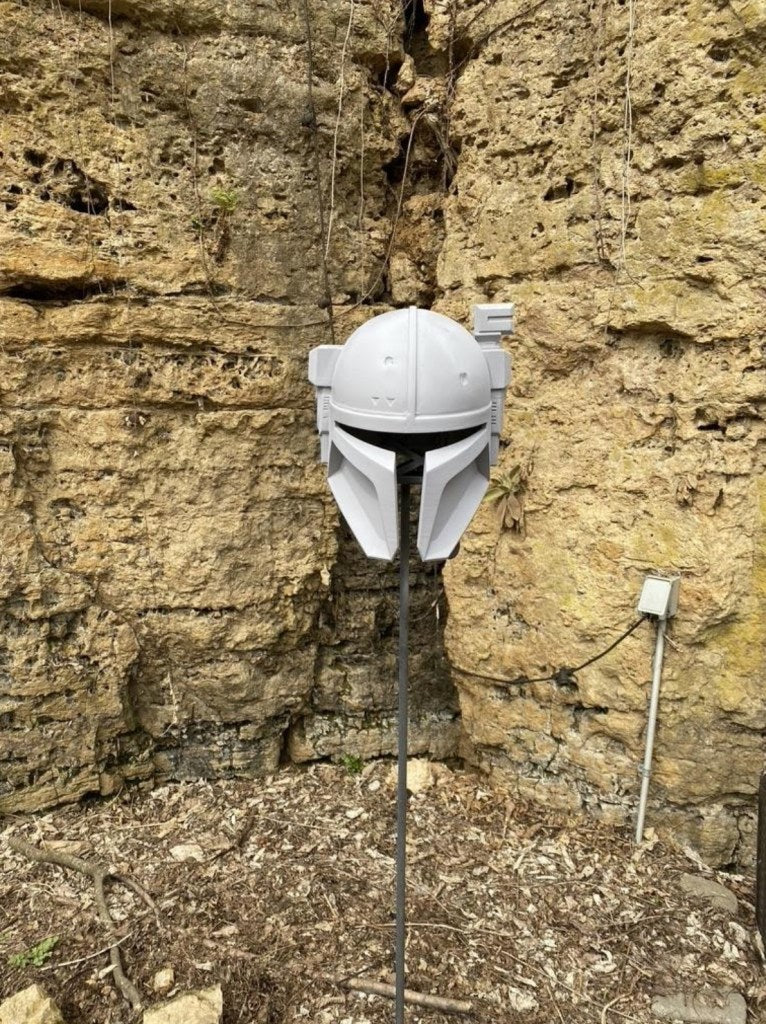
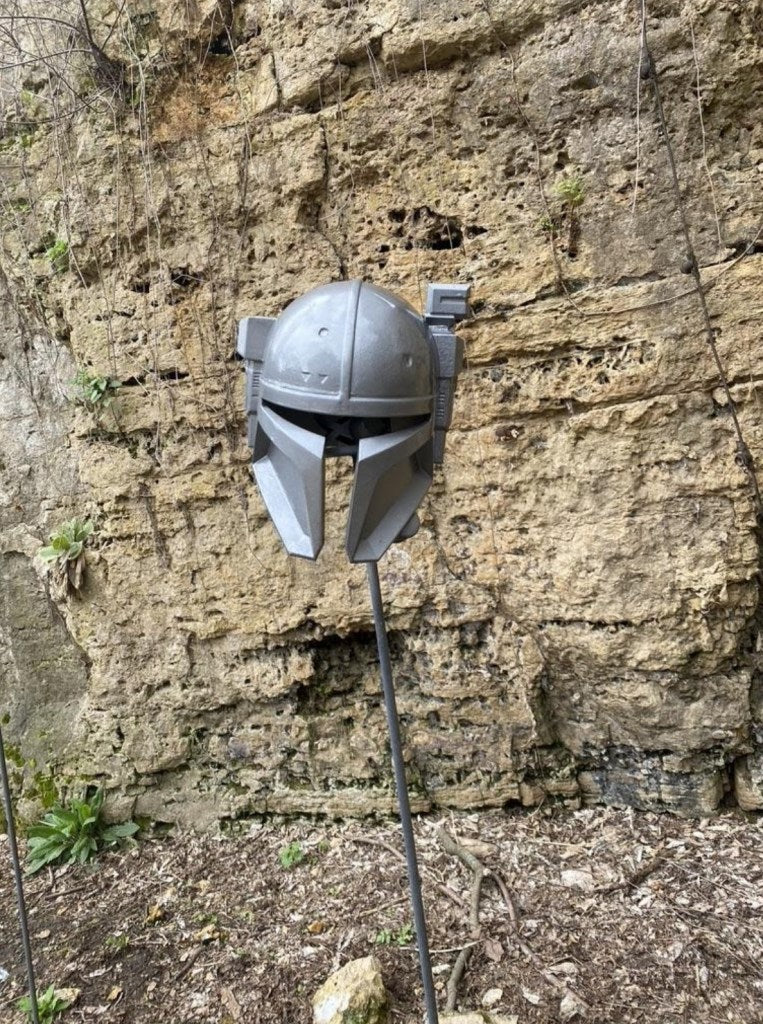
It turns out I got lucky here as well and only needed to scale one piece of the entire suit. Huzzah. The hardest part to gauge was the helmet, since I was lazy and didn't measure key points on my overly-large noggin and compare them with the interior dimensions of the STL–but again, luck was on my side and I ended up with a helmet that fits quite well (if a little snug against the cheekbones).
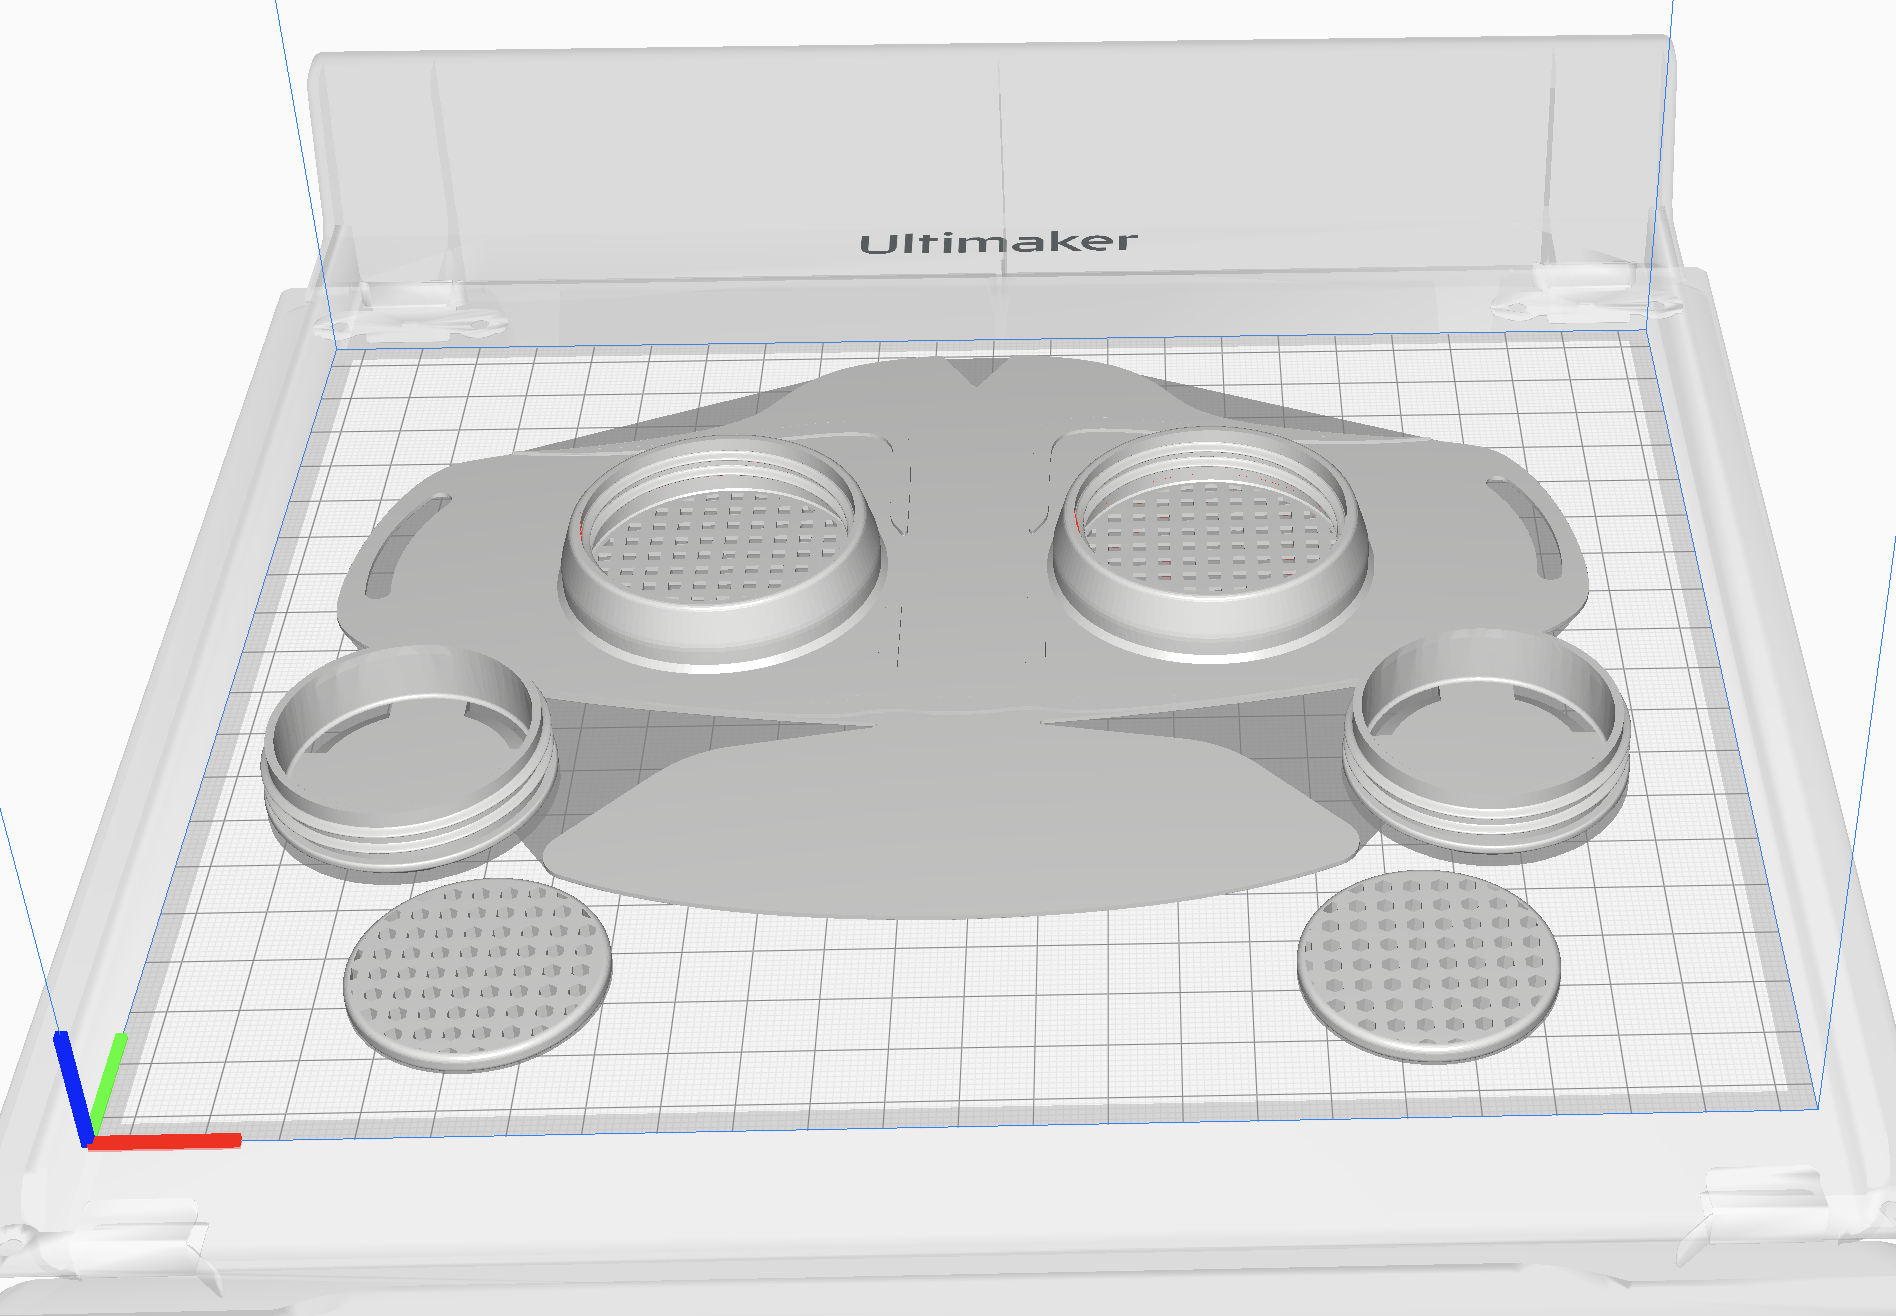
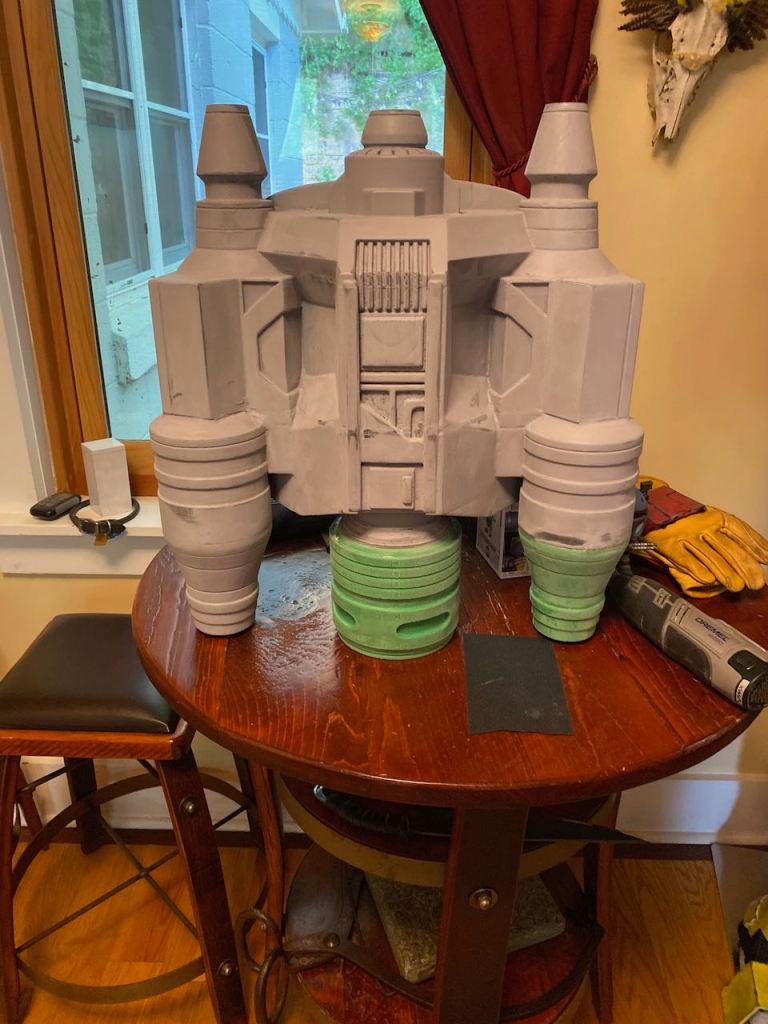
3D Printed Mandalorian Armor

I'm not the guy to dictate all sorts of custom print settings for you. I used Ultimaker's Tough PLA filament at more or less recommended settings throughout. The one thing I will say is that you can push the time vs. quality consideration for line thickness slightly towards the time side – I went with .15mm throughout, though I could have gotten away with .2mm. The finishing work you're going to be doing will hide pretty much all print lines.
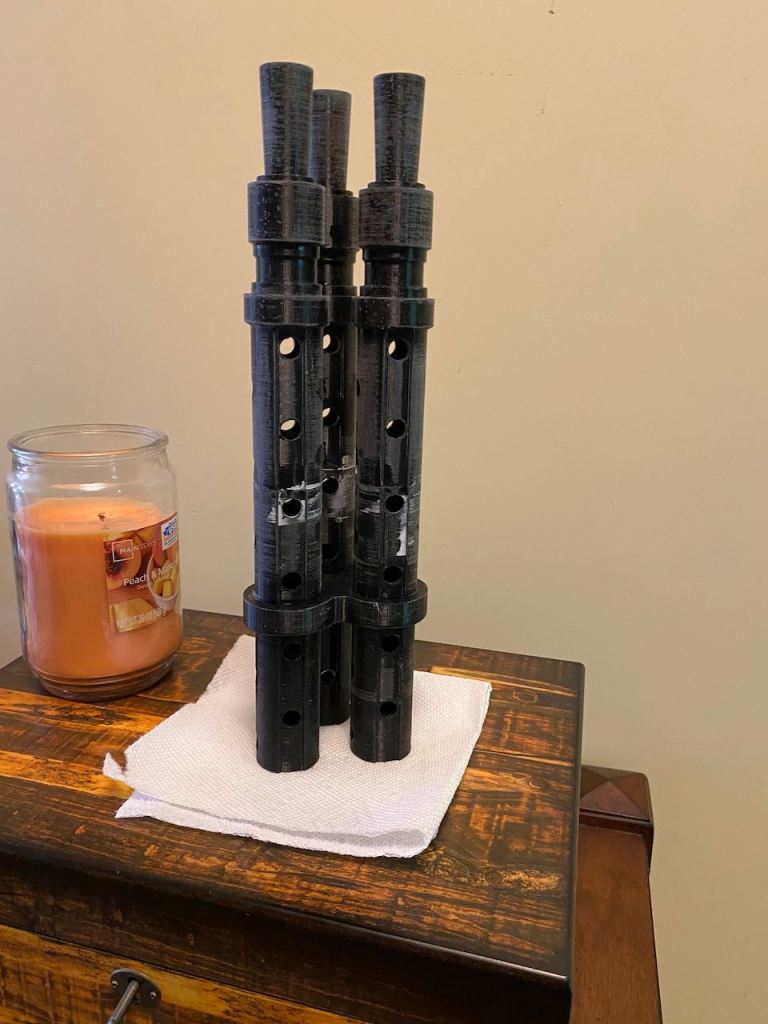
Chances are, your printer is not going to be big enough to handle some of the pieces – you're going to need to cut them (I used Meshmixer for this). Lesson learned here: when cutting your pieces, pay attention both to how they're going to print (cutting them down to require minimal supports) as well as how they're going to function.
In printing the backplate of the suit, I opted to cut the shoulder straps off (the parts that arc up over the top of the shoulders and join into the chest plate). This left me with a reasonably flat (ish) piece to fit around my back. Easy to slice up and portion out on the printer. The problem was that those shoulder straps end up experiencing quite a bit of stress – right where I cut them from the back plate.
Superglue (CA) is really strong under tension–.not so much under flexion. It's very easy to crack. If I had moved the cut down onto the back plate itself, the shoulder straps would have had all the strength of solid PLA holding them together and the superglued join would have been under simple tension on the backplate. Since I didn't plan for that, I had to learn the next part.
Gluing the Pieces Together
Ah CA, that marvelous glue. Remember those old commercials with the guy supergluing his hardhat to a steel girder and then hanging from it over an apparently precipitous drop? Yeah, it'll do that. What they don't show in that commercial is someone whacking the girder with a hammer – that shock would crack/shatter the superglue and our hero would have a rather ignominious end. The problem is that CA is really your best bet for joining pieces together – it cures fast and even that cure time can be accelerated with the use of products like Stick Fast Accelerator –instantly sets CA glues.
So, get yourself a LOT of CA glue. I'd recommend various viscosities – from large bottles of the liquid to Gorilla superglue gel. Ignore the bit about 1 drop per inch and coat your seam with it. Hold the pieces together in the exact position you want them (I strongly recommend gloves for this part) and then hit it with the accelerator. You now have yourself a single, firmly glued piece–that will break apart if you drop it onto a hard surface.
That last part bit me more times than I would like to talk about. So I won't. I'm going to pretend that I immediately saw the utility of reinforcing any seams where you join pieces together (whenever possible, like on the inside of the 3D printed mandalorian armor plates or the inside of the helmet).
I'm also going to pretend that I wasn't impatient with this – that I knew that using a quick-curing two part epoxy and slathering it on would help, but still result in a relatively brittle bond that could be shattered with a hard fall or strong flexion. Clearly, what I intuitively knew from the start was that you should get yourself a roll of fiberglass tape. Coat the fiberglass tape in epoxy and then lay it along the seams. For particularly troublesome areas (like those darned shoulder straps) use multiple layers, coating each in a hefty dose of epoxy.
For those that don't know, in the inevitable event that you manage to coat yourself and/or your loved ones in superglue, nail polish remover will remove it.
Just something I read.
Totally didn't happen to me multiple times.
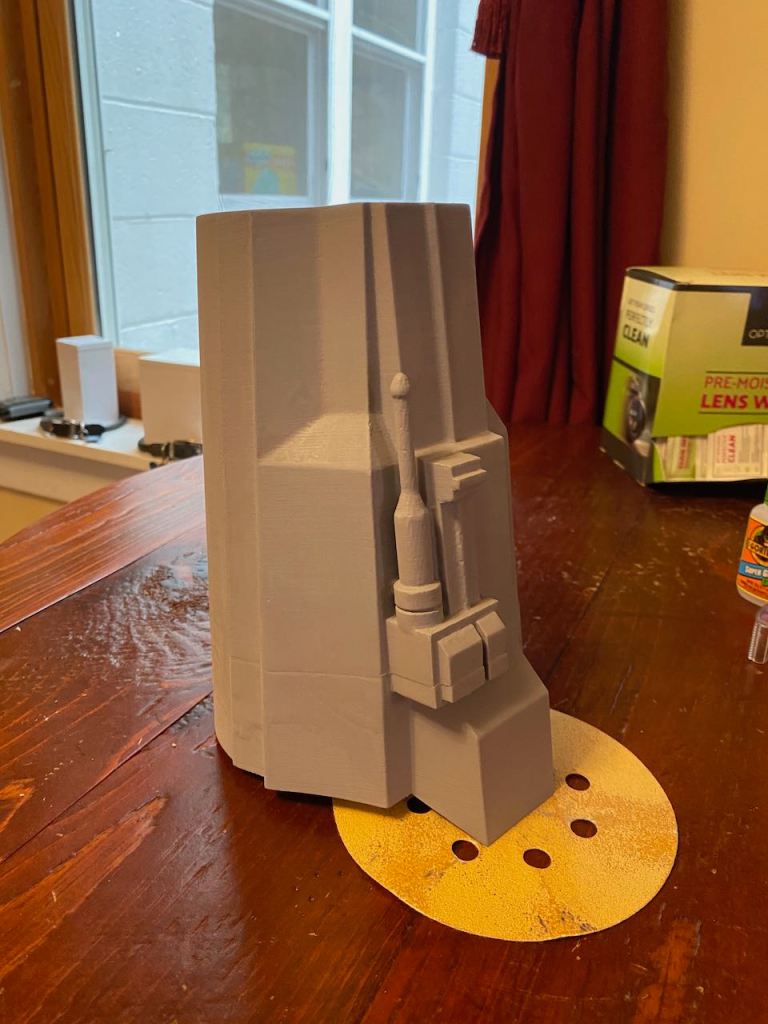
Finishing Prep
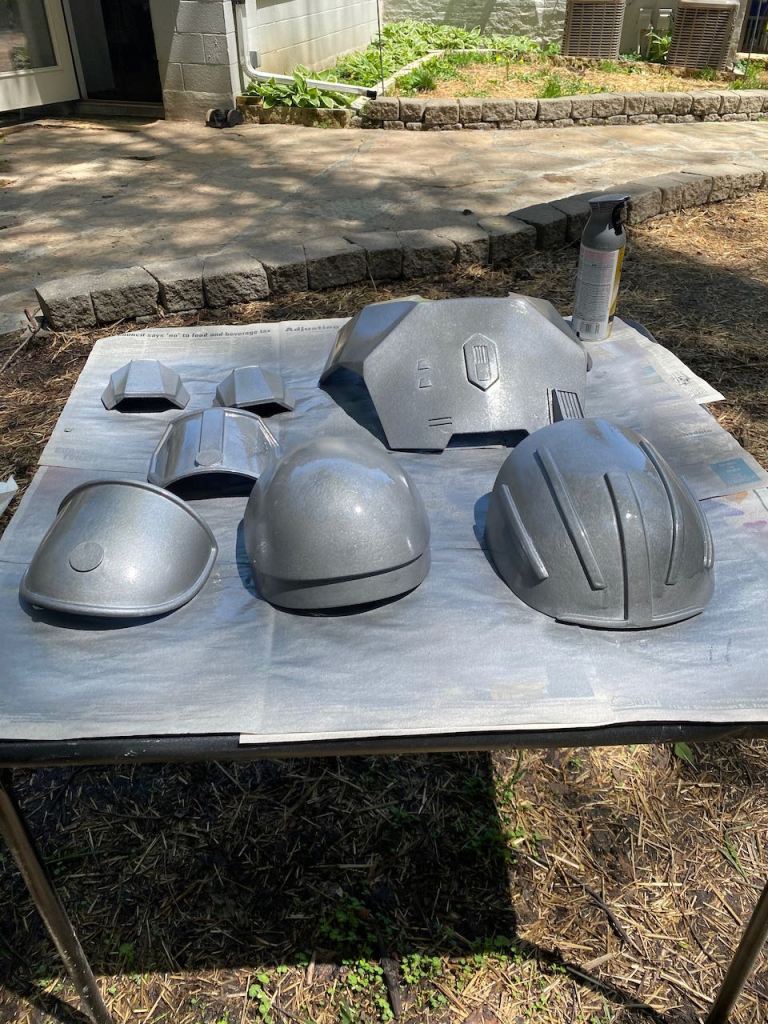
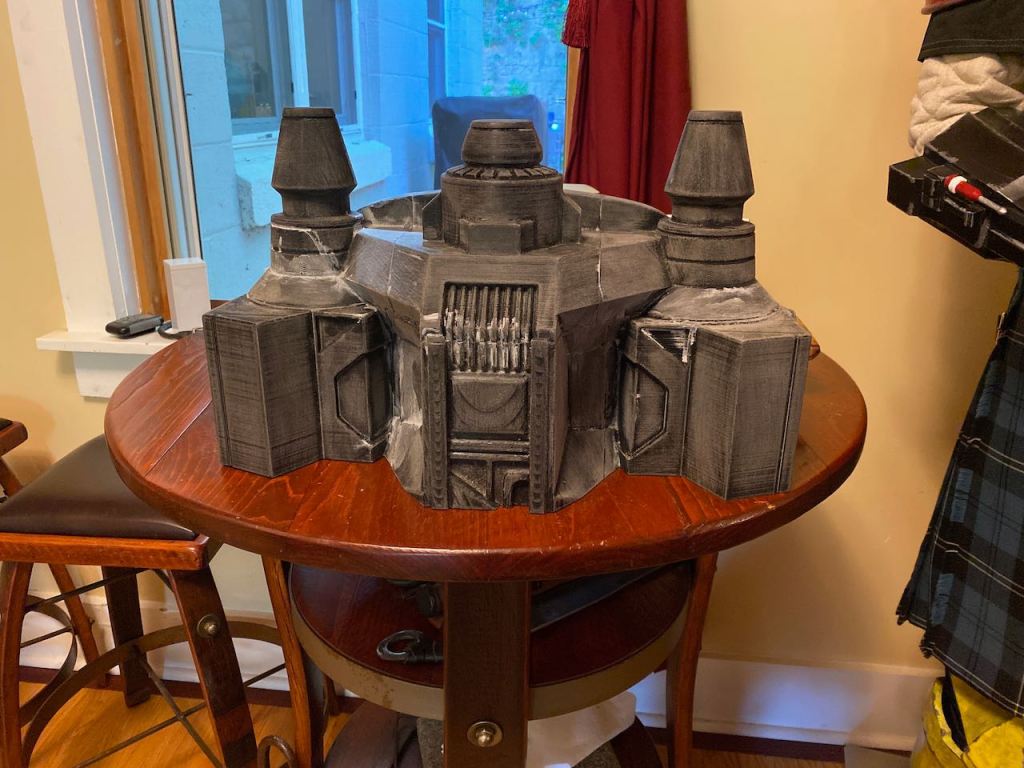
So everything is printed, glued, reinforced (wherever possible) and ready to paint and be done, right? Not even close! Now you get to become intimately familiar with the fine art of sanding. Even printing at .1mm (or .06mm if you want to be silly and take forever) you're going to have VPLs (visible print lines). Even on a rough-and-ready piece like battle-scarred 3D printed Mandalorian armor. And no one likes VPLs, right?
So you sand. I recommend doing an initial quick sanding of the raw piece – get rid of any overflow or drops of the CA from your gluing process and smooth out the worst of the print lines. Then you hit it with a godsend of a product: sandable filling primer. The stuff will stick to anything, is reasonably viscous (so that it lays down in a fairly heavy coat), and once dried can be sanded down. When you first spray it on, you'll still see all your print lines. Heck, you'll likely see lines and gaps that you didn't realize were there. This is just your first pass, so have patience. Give the piece an even coat with the filling primer and then try to forget that it exists for a good 24 hours.
The next day you should suddenly remember that you have a piece waiting – now the fun starts. I found that a 120 grit sandpaper works well for this, ideally a good wet-dry sandpaper. Start dry – sanding down until you either have a nice, smooth surface or you see the print material. You're going to go through a LOT of sandpaper during this as it gums up with the primer.
Look over your piece. Any remaining print lines will need another coat of primer. If you see gaps (particularly along seams), fill those in with more CA (followed by accelerator) and then sand down to smooth before hitting it with the next coat of primer. Lather, rinse, repeat. Wipe hands on pants.
After your second coat, you should have a pretty smooth surface to start painting (finally). If you want to get really smooth, do a wet sand – keeping a light flow of water going over the piece as you sand it down, normally with a finer grit paper (not much point in going past 400 grit here).
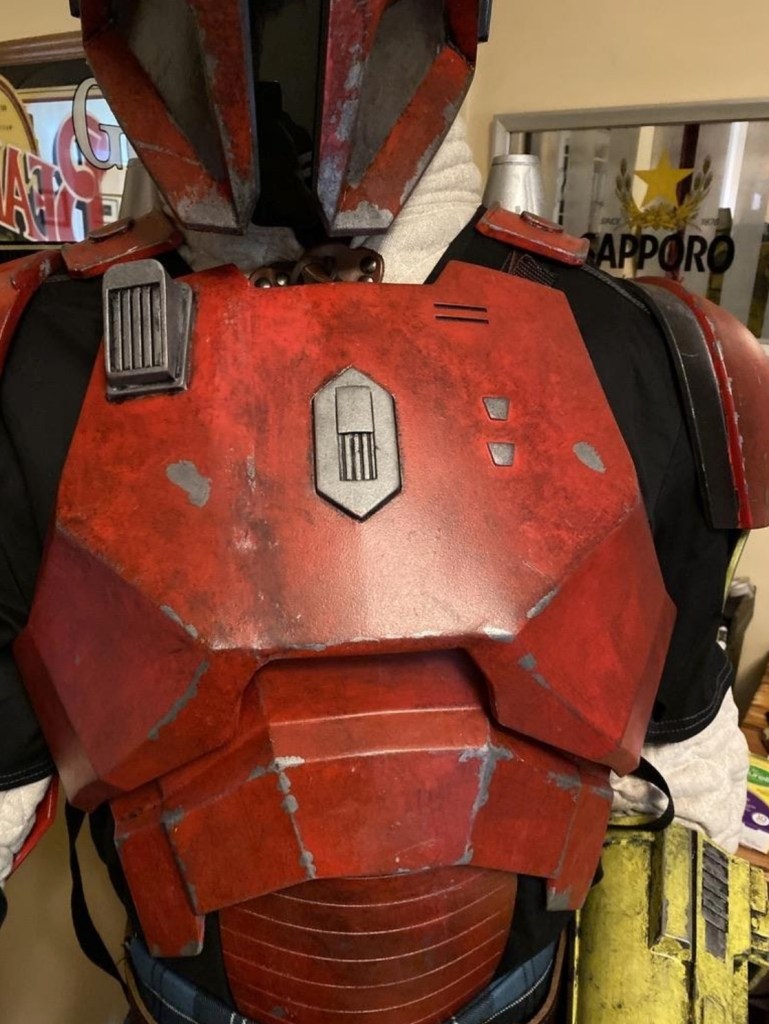
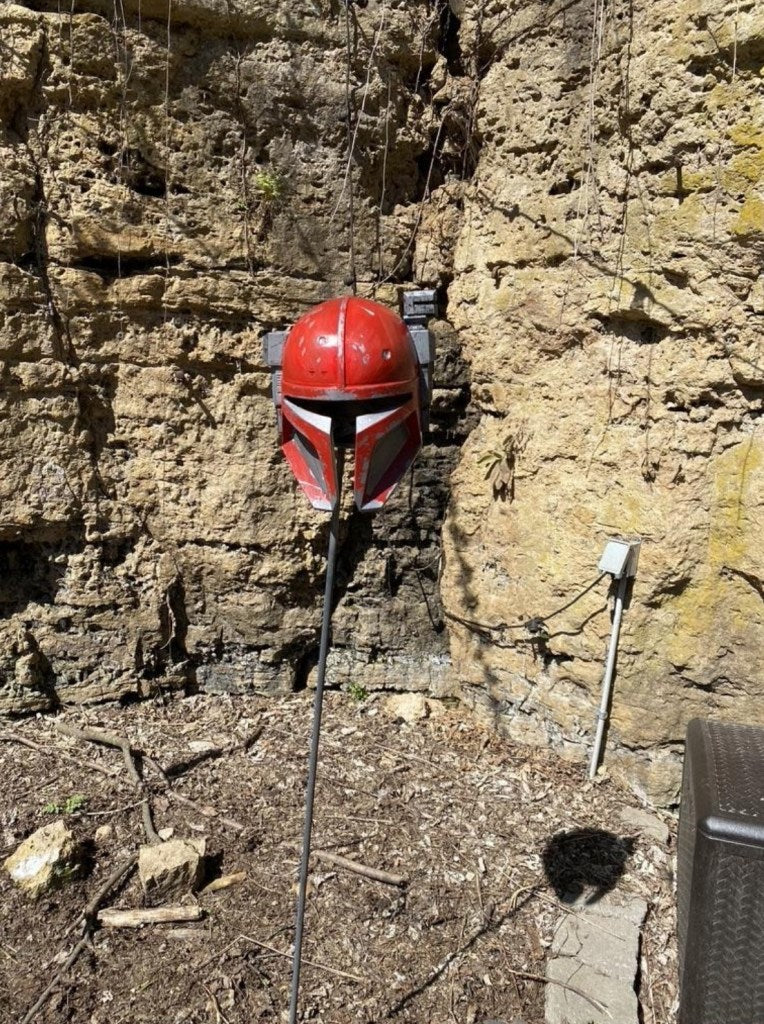
Painting and Weathering your 3D Printed Mandalorian Armor
I was dreading this part at first. I am not what you would call artistic. But I have spent plenty of time beating the tar out of things and have a reasonable idea of how they age and weather.
This is important.
You need to know what you're going to be doing to your piece before you start painting it.
If you want shiny and bright, this part is easy (hah!) – it's all a nice smooth coat that any little drip or blemish will stick out on. If you want weathered, however, you need to figure out how. The weathering of a piece should tell a story. Knee armor should be heavily scratched and worn, while armor plates that wrap around your side will likely have minimal or fine wear. Corners and high points get hit and paint chips off, exposing the metal underneath – you need to mimic that on your piece.
The good news is that none of this is terribly difficult.
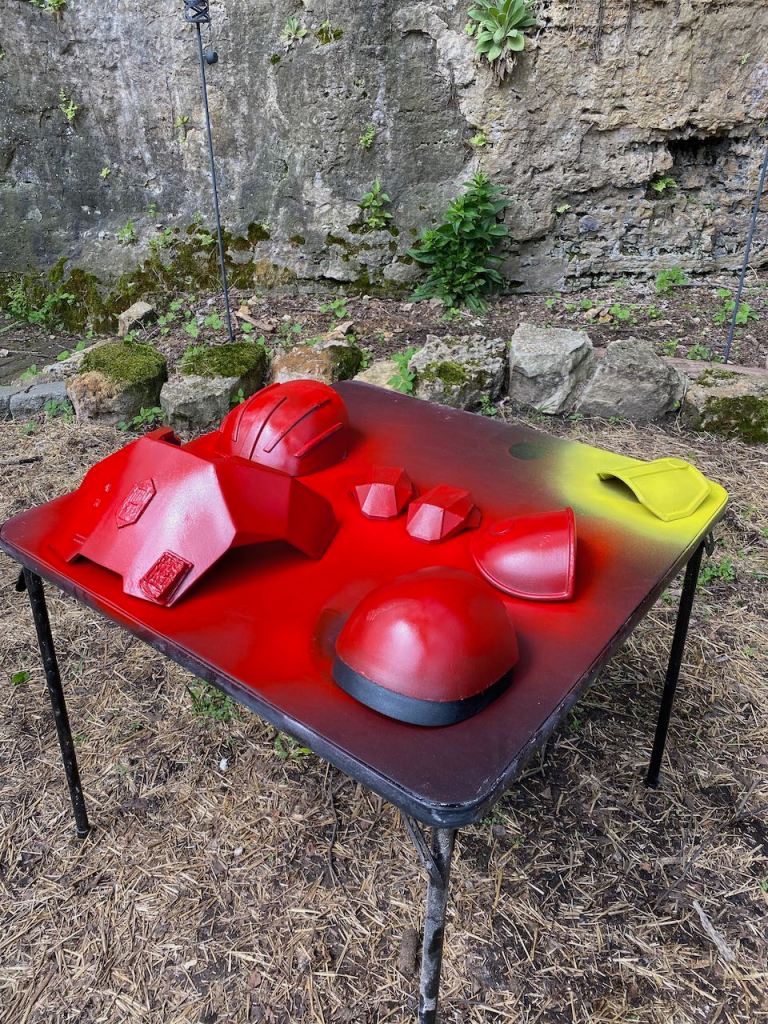
The first step is to establish the base layer of your piece – what it should appear to be made of when the paint chips away. Most spray paint manufacturers have metallic spray paints. I went with Rustoleum Weathered Steel. The main thing is to match your paint brand to your primer – use the same manufacturer. You're playing with chemicals here, best not to have a bad reaction at the very end of your piece.
So, find a metallic paint that you like and give the piece a nice even coat with it. Have a few drips during this? No problem! Those can be sanded down (once dry) with a high grit paper. This isn't the finished layer, so you have some room for error.
Once the metallic paint is dried, rough it up slightly with a fine grit paper – this is just to help the next layer of paint stick.
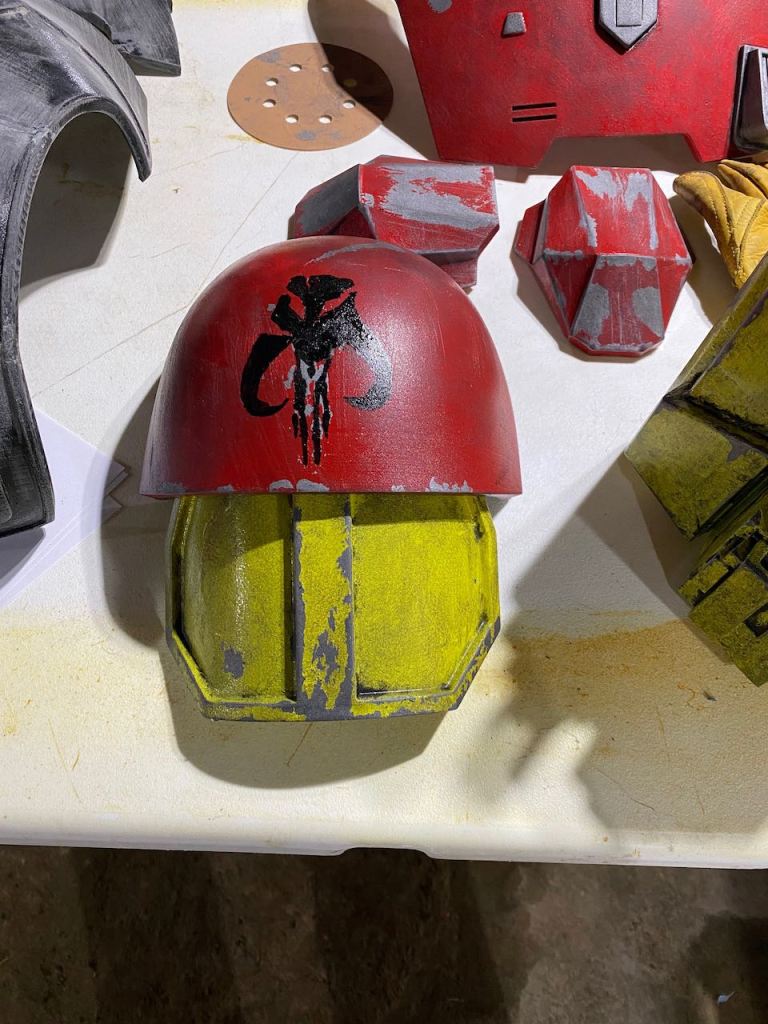
Now it's time for some art – creating the heavier chips and gouges through the outer layer of paint. Use masking tape for large areas that you want to remain –metal?. For chips, gouges, and large scratches, get yourself a bottle of liquid masking fluid–basically liquid latex. Paint it onto the areas where you want chips, etc. Once dried, it'll peel away relatively easily, so you paint over it and then peel it off and have instant wear and tear.
With your masking tape and masking fluid in place, it's time for your top coat (or top coats if you want to get fancy). Pick your color and go to town. Take care to keep this layer relatively smooth/drip-free – have a wet brush on hand to smooth out any drips that occur (and touch up with the spray as needed).

Once this top layer of paint dries it's time for the first reveal – peel off any masking tape (carefully) and then rub off any/all masking fluid that you put down. You should now have a nicely gouged and chipped piece–that is suspiciously devoid of dirt and the more minor scratches that come with wear.
Start with those scratches – take a course grit sand paper and beat the heck out of areas of high wear (like the knees). Use varying grits and go in different directions. Think of this as if the piece is being worn down by a sand storm–just in fast forward. Using a 400 grit, lightly hit all remaining areas of the piece, just to give the next part something to stick to–because it's time to get dirty. Just whack it with the sandpaper - you're looking to scratch the piece, not sand through all of the paint.
You can read any number of articles on making things look dirty, with folks using various different colors of paint and different finishing techniques to mimic rust, red dirt, black dirt and dust, etc. I kept it simple and went with a heavy layer of black –smoke damage.
The process is generally the same regardless of what you're after: with your roughed up nearly-finished piece, take some black acrylic paint and dilute it about 50/50 with water. Paint that into some of the corners and then immediately dab it off with a paper towel. Continue to dab your newly painted paper towel over the high spots to dirty them up.
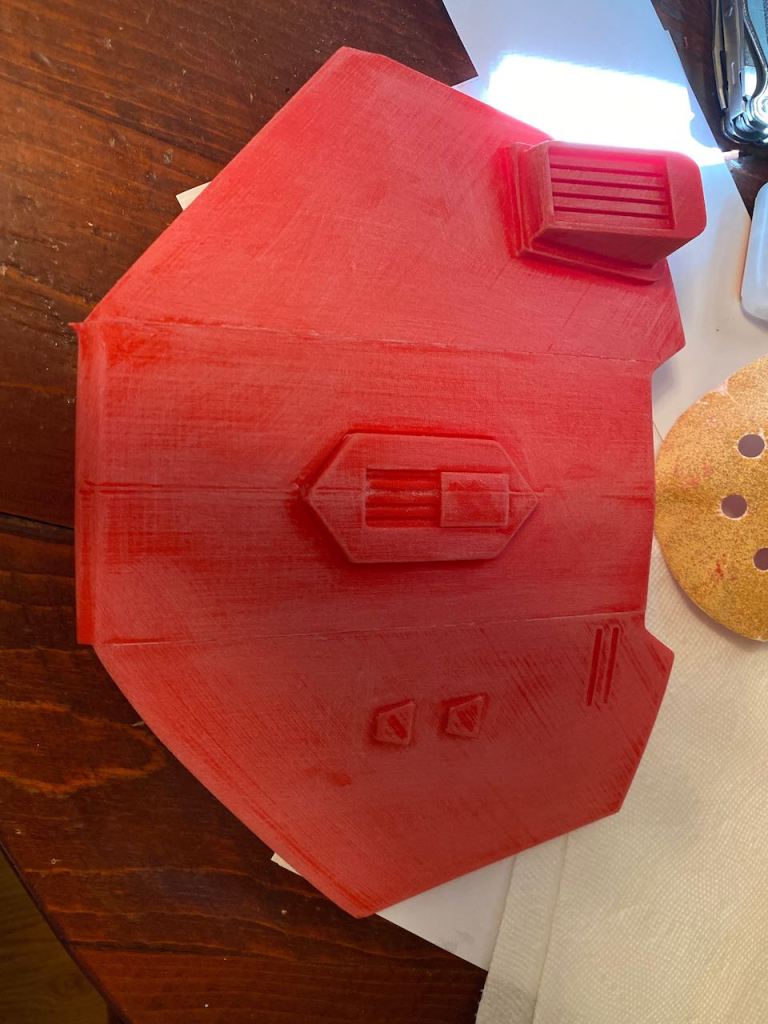
The corners are going to have heavier black residue remaining (that dirt that you can never quite get rid of) and the rest of the piece is going to take on a nice aged patina. Plan on everything darkening in hue a bit during this process – my piece started out disturbingly bright red and yellow until I hit this stage.
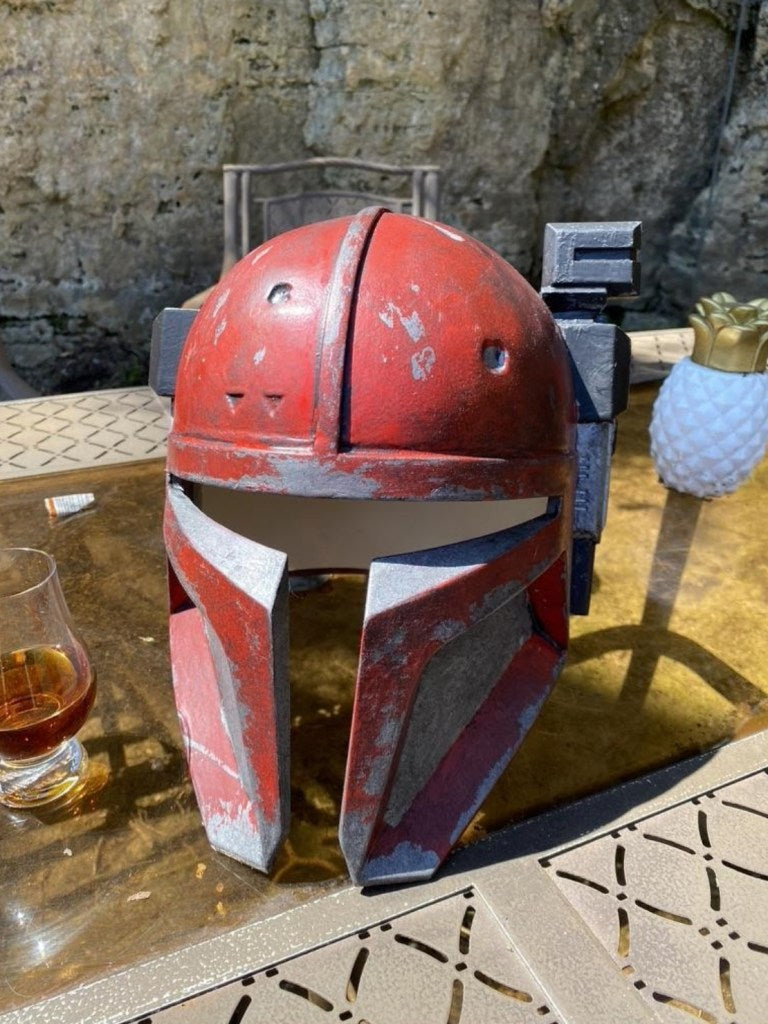
Once done playing in the dirt, hit the entire piece with a couple of layers of clear coat. Depending on the finish you're going for, use either a matte or a satin (gloss only for pieces that should look really shiny, which tends to head towards the plastic side of things). Other than attaching it all together, you?re now done!
Voila! Here we have this completed Serial Kilter 3D printed Mandalorian Armor! That wasn't so hard...was it?
Want to Share Your Story on our Blog?

We would love to get more stories like this to share on our blog! If you have an interesting project you are working on or have completed that you have used your Ultimaker 3D printer to help create, please email us at jen@3duniverse.org to share your story!
If we choose your project to feature on our blog, we will send you *4 FREE rolls of filament as a thank you! (Does not include 750g PVA spools and you must have a US shipping address!)
Written By Jen Owen

Related Articles
Affordable Assistive Tech Created for Children with the Mayku Multiplier
May 15, 2025
Bethany Children's Health Center in Bethany, Oklahoma, cares for children with complex medical needs, striving... More
The Mayku Multiplier: A Game Changer in the Dental Industry
Apr 03, 2025
Benchtop pressure formers like the Mayku Multiplier, are revolutionizing the dental industry by enhancing the... More
Reshaping Aerospace Innovation with the Mayku Multiplier
Feb 10, 2025
At Bristol University’s aerospace department, students combine analytical methods with hands-on experimentation to design and... More
Revolutionizing the Dental Industry with the Mayku Multiplier
Dec 04, 2024
The Mayku Multiplier for Dental is a first-of-its-kind benchtop pressure former that achieves sub-one-micron resolution... More

Introducing the MY YARD Vacuum Forming Machines
Oct 01, 2024
We are excited to share that we have brought the MY YARD desktop vacuum forming... More
Rapid prototyping in R&D with the Mayku Multiplier
Sep 03, 2024
In the world of R&D (Research and Development) there are generally 4 common problems that... More
Search All Articles
Latest Posts From 3D Forming (Vacuum Forming & Pressure Forming)
All Blog Categories
-
3D Universe Untethered Video Podcast Series
-
Digital Fabrication in Education
-
Digital Fabrication Projects
-
Digital Fabrication Tutorials, Tips, and Tricks
-
Slicing Software
-
3D Printing Materials
-
Case Studies
-
Digital Fabrication Products
-
3D Forming (Vacuum Forming & Pressure Forming)
-
Laser Cutters
-
Digital Fabrication in the Workplace
-
3D Printed Prosthetics and Assistive Technology
-
3D Modeling (CAD)
-
Digital Fabrication in the News


